

 By Deputy Al Cardarelli, Field Training Coordinator
Institute for Criminal Justice Studies
Broward County Sheriff’s Office
I would like to share an interior vehicle handcuffing technique that I have been using and teaching now for almost ten years. Once demonstrated, you will realize that this is a very safe, dynamic and smooth technique to utilize. The actual handcuffing is completed before a person’s “fight or flight” reactionary time principle can take over due to the element of surprise and how fast the first handcuff is applied. I have incorporated the grabbing and controlling of the suspect’s body movements from over thirty years of experience in martial arts.
It is imperative to always gain a tactical advantage when you are about to go “hands on” with an individual. Why give somebody an opportunity to “even the playing field” by exiting their vehicle in an attempt to escape, challenge, or attack you? You can have the suspect secured in the amount of time that it would take them to exit the vehicle. This technique is to be utilized when you have already decided that you are going to arrest the vehicle’s occupant, maybe for a suspended license or a warrant.
The Handcuffs:

By carrying the handcuffs on the right front of your belt makes them easily accessible with either hand. They are stored key hole to key hole, single strand forward and loaded, which means that it will only click a few times before the single strand releases. Remove the handcuffs by grabbing the top of both handcuffs with your right hand. Secure the cheek plate of the outer cuff with the front of your hand and allow the inner one to drop, securing that cheek plate with the back of the hand. Both single strands should be forward. (See photographs)
The Grip:
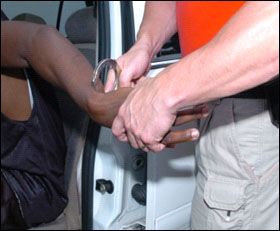
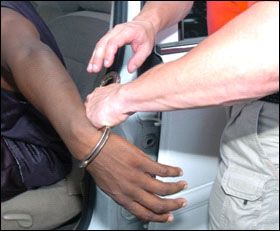
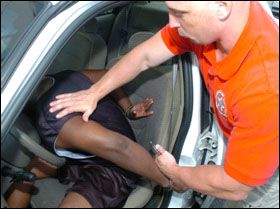
Start by instructing the driver to turn the vehicle off as a safety precaution. Take control of the driver’s left hand with your left hand. The grip, which is very important, needs to be on the back of their palm. Your thumb is on the bottom and your four fingers on top with your index finger on the other side of their thumb (see figure #2). Rotate their palm downward, and towards you placing their pinky finger and elbow in an upward position while applying pressure to their four fingers (see figure #3). Immediately apply the first handcuff with your right hand to their exposed wrist.

This is an excellent opportunity to immediately start using your “verbal judo” skills. This helps keep them distracted by talking to them throughout the technique. You may say things such as “Relax, I’ll explain why you are being handcuffed in just a minute, go ahead and lean forward, give me your other hand.” Many times I do not receive any resistance.
Transition the free cuff to your left hand and push the occupant’s shoulder forward and downward towards the steering wheel. This will prevent them from turning towards you. Instruct them to place their right hand behind their back. With your right hand, follow up with the “handshake grip” and apply the second cuff. Keep a hold of this “handshake grip” to escort them out of the vehicle. Once outside the vehicle, you can either walk them with control using the “handshake grip” or tuck the elbow into you and use a bent wrist. In the pictures below, Deputy Brent Edwards assisted me in demonstrating the technique.
The Technique:
 1. Grab the subject’s hand and rotate the elbow upwards | 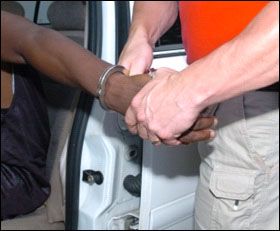 2. Place the first handcuff just below the wrist bone |
 3. Transition the handcuffs to your left hand by sliding your right out of the way | 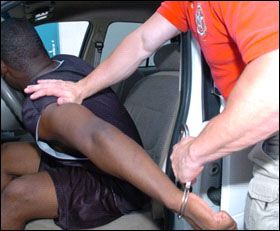 4. Lean the subject downward and away from you with your right hand on their left shoulder |
 5. Order them to place their other hand behind their back | 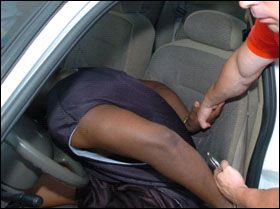 6. With your right hand secure it with a “handshake grip” |
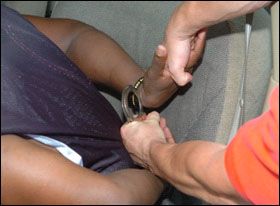 7. Pull their right hand into the handcuff | 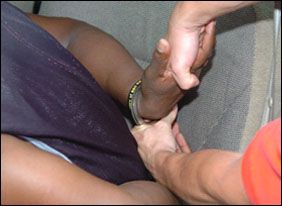 8. Apply the handcuff and maintain your grip |
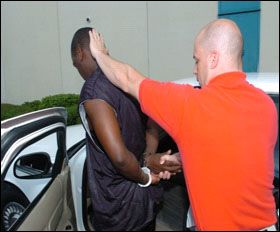 (Escort #1) You can escort the subject out of the car with the handshake grip and if there is any resistance, raise their hand higher to gain pain compliance |  (Escort #2) Elbow tucked in with a bent wrist, walk them backwards |
OPENED DOOR
- Tell driver to turn the engine off.
- Open door with left hand – If locked, tell the person to unlock their door.
- With your left hand grab the back of their left hand and rotate their pinky finger up facing their palm towards you.
- If needed, you can grab their left wrist with your right hand and pull it into your left hand.
- With your right hand place the cuff on their left wrist keeping a tight grip on the cheek plate and chain.
- Transition your left hand to the cheek plate and chain without letting the handcuffs loose. (if the single strand is backward, this is the time to turn it around)
- Place your right hand on the back of the suspect’s left shoulder pushing him downward, away from you, and forward towards the steering wheel.
- Instruct them to give you their right hand behind their back.
- With your right hand, utilize a handshake grip on their right hand.
- Pull their right hand up and over to the handcuff to cuff the suspect’s right hand.
Sometimes,depending on the size of the person, I will ask them to step out of the vehicle after I handcuff the first hand. I let them get as far as putting one foot on the ground and partially exit the vehicle. They are now in a semi-seated position with one foot on the street and the other on the floorboard of the car. This keeps their hips misaligned which causes weight displacement and keeps them off-balance. I perform the same technique of pushing the shoulder downward and forward to finish handcuffing their second wrist while their body faces the driver door hinges.
OPENED WINDOW
- Tell driver to turn the engine off.
- With your left hand grab the back of their left hand and rotate their pinky finger up facing their palm towards you.
- With your right hand place the cuff on their left wrist keeping a tight grip on the cheek plate and chain.
- Transition the cuff to your left hand as you open the door with your right hand. (If locked, tell them to unlock their door.)
- Reach around the driver door window frame and grab the cuffs with your right hand, allow the door to open fully, transitioning back to the left hand.
- Place your right hand on the back of the suspect’s left shoulder pushing them downward and forward to the steering wheel.
- Instruct them to give you their right hand behind their back.
- With your right hand, utilize a handshake grip on their right hand.
- Pull their right hand over to the handcuff and cuff the suspect’s right hand.
RESISTANCE
Another important benefit regarding this technique is your tactical advantage to address resistance. Placing your right hand above their elbow locks their arm and prevents the subject from being able to turn towards you. This is a mechanical lock and is physically impossible to do so with their arm in this position. Depending on the circumstances you can perform numerous techniques from this position. Understand that they are in a sitting position so they are already half way to the ground. You can use this to your advantage by simply pivoting, and pulling them out of the driver seat into a prone position on the ground. Use your prone position handcuffing technique to complete your handcuffing of the subject. If the subject grabs onto the steering wheel with the other hand and you can’t pull them free, disengage. You just identified someone that wants to defeat your actions and fight with you. Realize that this is not only a handcuffing situation anymore. You must deal with that threat accordingly by applying the necessary force to meet their resistance: TASER, Pepper spray, etc.
Remember, when someone resists and indicates that they want to fight with you, your number one concern is your safety. It is always safer to recognize this situation while they are still seated in a car, off balance or partially handcuffed. Recognize it here, instead of when they are standing face to face with you wanting to fight. I have had nothing but positive feedback from many law enforcement officers that I have taught this technique. I think this is worthy of sharing so please practice and stay safe.
Deputy Al Cardarelli encourages any feedback and may be contacted via email: Al_Cardarelli@Sheriff.org
Photographs by Broward Sheriff’s Office Photographer: Gene Herrera
